WP Post Modules for Gutenberg
Created: Apr 12, 2023. Last updated: Apr 12, 2023. Version: 0.1.0. Author: SaurabhSharma. email: xconsau@gmail.com
Introduction
Dear buyer, thank you for showing your trust in "WP Post Modules" plugin and purchasing it. I have handcrafted this document to lessen your efforts in configuring and using this plugin seamlessly. If you find any bug or issue which is beyond the scope of this documentation file, feel free to contact me through my CodeCanyon profile page here. Thanks so much!
Table of Contents
Install WordPress
If you have not set up your WordPress installation yet, you can download latest copy of WordPress from the WordPress.org. After downloading WordPress, go through the installation instructions inside readme.html file and set up your WordPress installation. A detailed installation guide can be found on official WordPress Site.
Install WP Post Modules Plugin
In order to install WP Post Modules, follow these steps:
1. Download plugin zip archive from your codecanyon.net account's downloads section and save on your local drive. You can download the "All files and documentation" archive or "Installable WordPress file only" plugin zip archive.
2. If you have downloaded "All files and documentation" archive, unzip/extract this archive and look for the folder named wp-post-modules-gt.zip. This zip archive shall be used for installation in WordPress admin.
3. Log in to your WordPress site and navigate to Plugins > Add New. Click on the "Upload Plugin" button.
4. Click on the "Choose file" button and browse the plugin ZIP file:
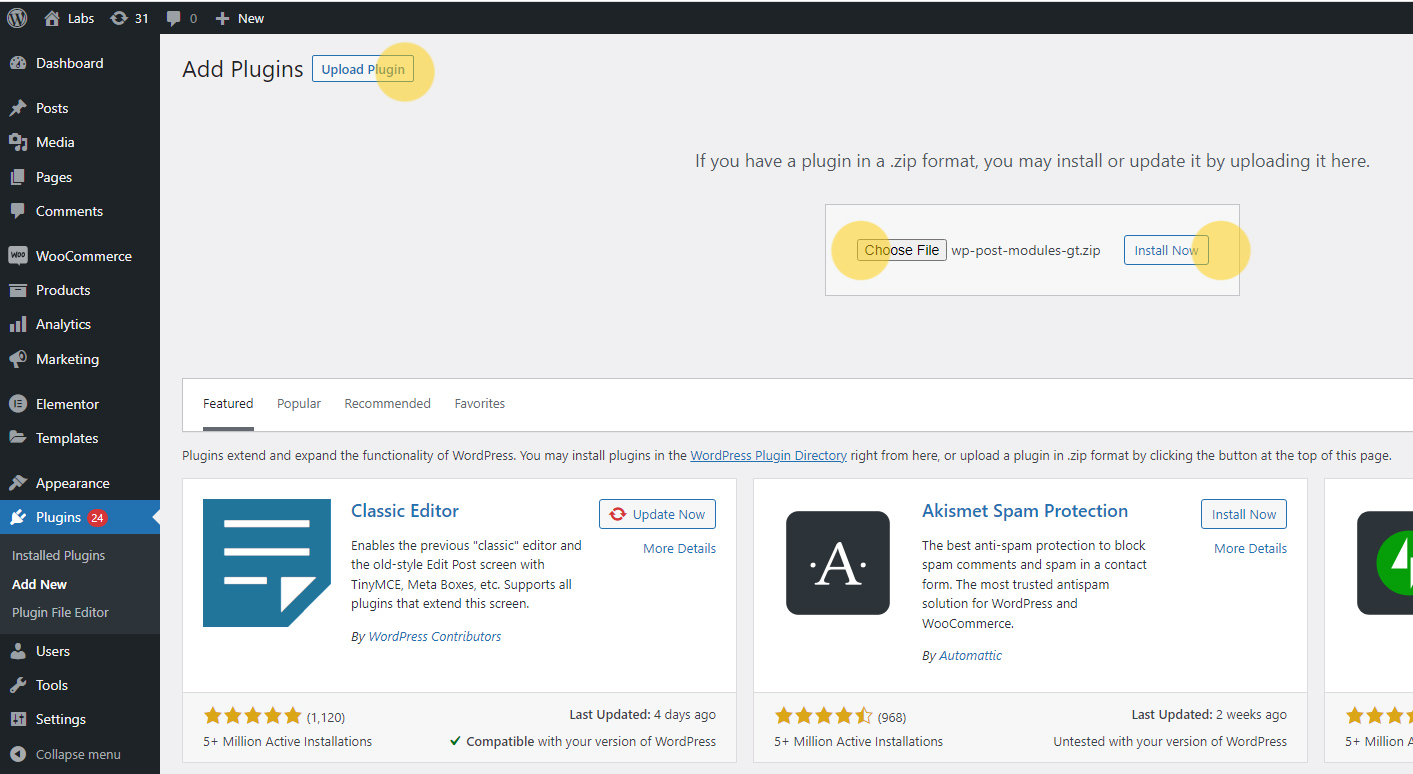 Upload Plugin
5. Next, click on the "Install now" button. The plugin will be installed.
6. After installation, navigate to Plugins > Installed Plugins, and activate the "WP Post Modules for Gutenberg" plugin.
Manual installation using FTP or File Manager
You can also install the plugin manually using FTP or File Manager. For that, log in to your website's Control Panel > File Manager, or log in to FTP and upload the extracted plugin folder to /wp-content/plugins/ directory. So your installed plugin address will be /wp-content/plugins/wp-post-modules-gt/. After uploading the folder, log in to WordPress and activate the plugin inside Plugins > Installed Plugins.
Creating a Post Module
Before you create a post module, it is required that your site contains some posts to show in this module. So if there are no posts yet, make sure you create some posts and assign featured images to them. Once you have some posts and categories, you are ready to use the Posts Module. Below is a video capture which shows how to create a new page and insert a post module in it.
Once the module is loaded, you can edit its settings inside the Controls sidebar. The "Query" tab will be opened by default. You can choose which posts to show by filtering them using category, orderby, number of posts, and other Query parameters in this section. The video below shows how to change the Query parameters for a module.
Editing the display styles
Once you have specified the Query parameters, you will need to choose appropriate display style for the module. That can be configured inside the "Display" tab of the Controls section sidebar. The video below shows how to change the display styles of a module.
You can further change a module's display and styling using all available options, categorized into various sections. The details of each section/tab is shown below:
Query: This section contains options for choosing the post results criteria. You can choose to show posts from category, custom post types, individual posts, tags, pages, etc. You can sort results based on date, comment count, title, etc. It supports most of the WP Query parameters.
Display: This section contains settings for choosing display style like grid, list, tile, ticker, etc. Depending upon the display style chosen, there are various sub settings for margin, padding, colors, columns, etc.
Image: This section contains image specific settings. You can assign image width, height, crop mode and various other settings for images.
Title: This section contains typography settings for post titles of the module. You can choose fonts from Google Fonts Library and assign typography settings to the post title.
Excerpt: Similar to the title section, this section contains typography settings for the post excerpt.
Post Meta: This section contains settings for the post meta of each post in the module. You can choose to show/hide post date, author, comments, etc. and style them with different colors and typography.
Social: This section contains option for enabling social sharing buttons per post. Using these share buttons, users can directly share a post on social platform.
AJAX: This section contains settings for enabling AJAX functionality on posts module. The plugin supports ajax next/previous navigation, and also ajax loadmore feature.
Slider: This section contains settings for enabling slider on a post module. You can choose number of slides to show, along with other settings like animation delay, timeout, etc.
Schema: This section contains option for enabling Schema Microdata in posts module. You can change schema properties in the text fields provided in this section.
Block: This section contains block level settings such as margin, padding, background and border options.
Using Pre Built Templates
WP Post Modules comes with ready-made Home page layouts and section layouts as shown on the live demo. These layouts are available in JSON format which can be imported and used as Reusable Blocks. The video capture below shows how to navigate to the reusable blocks page and import a pre-built Home page layout.
Once you import the reusable Home page block, convert it to the regular block as shown in the video above. By doing so, any changes in the page will only apply to the page and will not affect the saved reusable block.
Important: The posts data will be shown as on your site. It will not show posts as on live demo. If you want to show same posts as on live demo, you can import dummy XML data for posts and categories, and import to your site using WordPress Importer.
8. After importing the template, click on any post module and edit it's settings to change post categories, number of posts, etc. as per your requirement.
Note: If your theme supports full width page, it is recommended that you keep the full width page layout for proper display of templates. You can also use the WPPM Full Width page template which comes with the plugin.
Translating the Plugin
The WP Post Modules plugin is translation ready with language files included in the plugin. Though the POT and the PO/MO files are included in the plugin, the actual translation is applied using the JSON file. In order to translate the plugin, kindly follow these steps:
1. The first step is to determine the language code of your current site. Whether you are using English, French, or German, the language code will be visible inside the source code of the website, as shown below:
<!DOCTYPE html>
<html lang="fr-BE">
The lang="fr-BE" shows the language code used in the site. In the above example, the language code is for French (Belgium). This language code will be used in next steps.
2. Navigate to the wp-post-modules-gt/languages/ and locate the file named wppm-gt-[language_code]-wppm-gt-index.json. Rename this file so that the [language_code] is replaced by the actual language code. In our example, this name will become wppm-gt-fr-BE-wppm-gt-index.json
3. After renaming the file, open this file in any text/code editor like NotePad++, Sublime Text or VS Code. At the beginning of the file, you shall see the following entries:
"locale_data": {
    "messages": {
      "": {
        "domain": "messages",
        "lang": "language_code",
        "plural-forms": "nplurals=2; plural=(n > 1);"
      },
Change the language_code value to your actual language code. E.g. fr-BE.
"lang": "fr-BE",
4. In rest of the file, you shall see all available strings which can be translated. The translation shall go in front of each string within the quotaton marks. For example:
"Number of posts": [ "nombre de postes" ],
5. After making all necessary translations, save the file. These changes shall automatically reflect in the backend block UI
Frequently Asked Questions
Below are some Frequently Asked Questions that may help you in finding a solution to your specific issue.
1. I have just uploaded the download zip file to WordPress, but it is showing installation error. Why?
Your download zip file is not the plugin itself. It is a collection of plugin and documentation. It will be required to unzip this folder first. Next look for the folder named "wp-post-modules-gt.zip". Use this zip folder for uploading the plugin via WordPress. Alternatively, you can choose the "Installable WordPress file only" option from your CodeCanyon account's downloads section. This file is directly installable as plugin zip file.
2. How to update the plugin
2.1 Manual Update
Using WordPress admin: Navigate to Plugins > Installed Plugins. Deactivate the "WP Post Modules" plugin and delete it. Next, install the latest copy of the plugin by browsing the wp-post-modules-gt.zip file from your computer.
Using FTP or Control Panel: Log in to your FTP or Control Panel of hosting account and locate the /wp-content/plugins/wp-post-modules-gt/ folder. Delete this folder and update the latest extracted folder from your computer. This method is safer than the previous one.
2.2 Automatic Update
For automatic updates, install the Envato Market plugin. More details on automatic updates are described on the plugin page.
Important: After updating the plugin, clear all browser caches and plugin caches (if using a caching plugin).
Sources and Credits
The plugin uses following files and resources, as listed:
jQuery Marquee
@author Aamir Afridi - aamirafridi(at)gmail(dot)com / http://aamirafridi.com/jquery/jquery-marquee-plugin
jQuery Owl Carousel
https://github.com/OwlCarousel2/
BFI Thumb
(c) 2013 Benjamin F. Intal / Gambit
Live demo images
www.pexels.com
www.unsplash.com
Once again, thanks so much for purchasing this plugin. I'd be glad to help you if you have any questions relating to this plugin. If you have a more general question relating to the plugins on CodeCanyon, you might consider visiting the forums and asking your question in the "Item Discussion" section.
Saurabh Sharma