Qalam1.0.0
Created: June 10, 2019. Last updated: Oct 28, 2024. Author: SaurabhSharma. email: xconsau@gmail.com
Introduction
First of all, let me thank you for showing your trust in Qalam theme and purchasing it. I have handcrafted this document to lessen your efforts in configuring and using this theme seamlessly. If you find any bug or issue which is beyond the scope of this documentation file, feel free to contact me at xconsau@gmail.com. Thanks so much!
Important: When you install and activate a theme, it doesn't automatically load the content as shown on live demo. It will be required to import/create content, add images, configure settings and widgets so that they appear like live demo. Below is a step by step guide on configuring and setting up the theme as shown on demo.
Table of Contents
- Install WordPress
- Install Qalam Theme
- Install Child Theme
- Install Required Plugins
- Import Dummy Content
- Create Home Page
- Create Navigation Menus
- Widget Areas and Widgets
- Customizer Settings
- Filter and Action reference
- Language Localization
- HTML structure
- CSS files
- JavaScript files
- Frequently Asked Questions
- Sources and Credits
Install WordPress
If you have not set up your WordPress installation yet, you can grab a copy of latest WordPress archive here. Next, go through the installation instructions inside readme.html file and set up your WordPress installation. A detailed installation guide can be found on official WordPress Site.
Install Qalam Theme
In order to install Qalam Theme, follow these steps:
1. Log in to your themeforest.net account and download the "Installable files" theme folder. (This will be qalam.zip file).
2. If you have dowloaded "All files and documentation" folder, unzip/extract the download archive and look for the folder named 'qalam.zip'.
3. Log in to your WordPress site and navigate to Appearance > Themes. Click the "Add New" button.
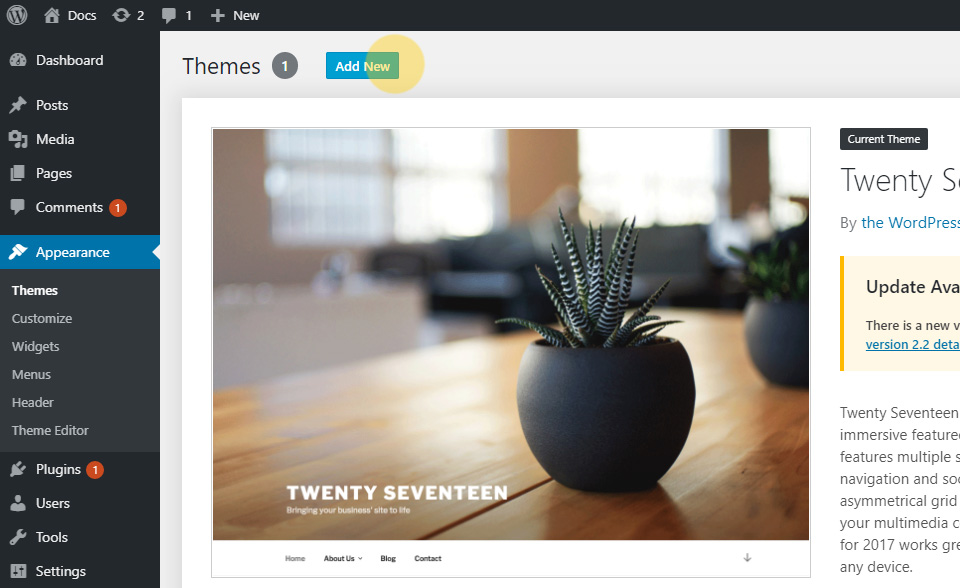 Add new theme
4. On the "Add Themes" page, click on the "Upload Theme" button. Next, click on "Choose File" button and locate the qalam.zip file for installation.
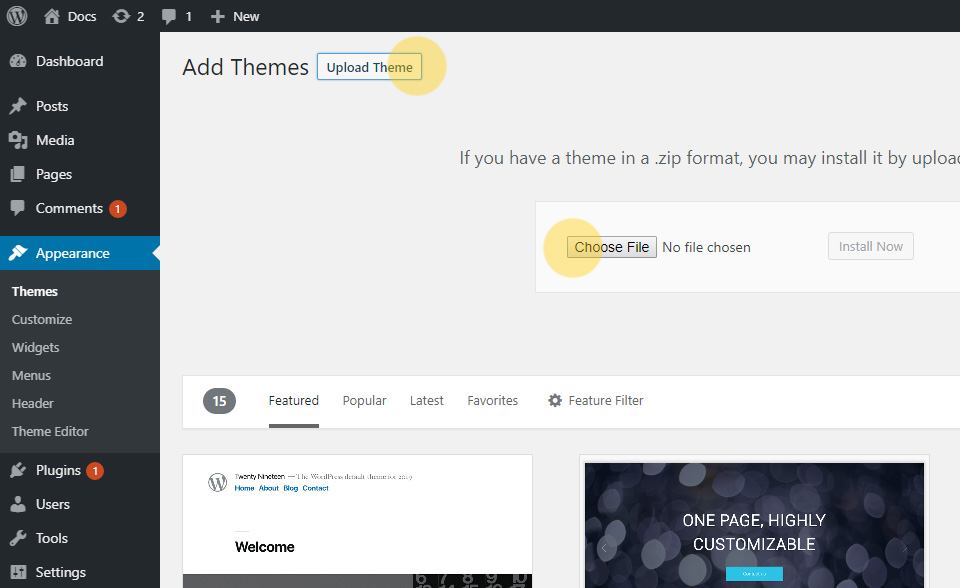 Upload Theme
5. Click on "Install Now" button.
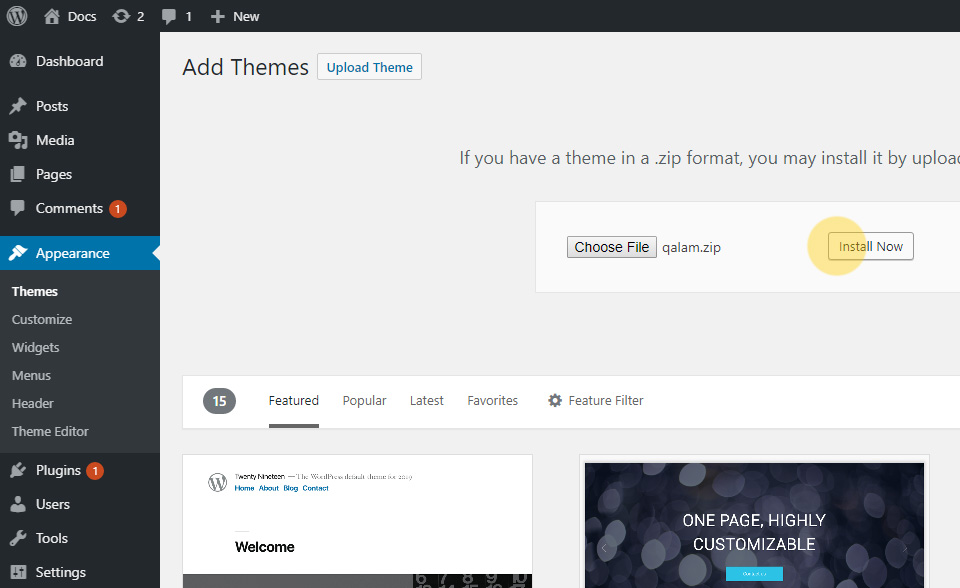 Install Theme
Important: After successful installation, do not activate the theme. We will install Child Theme and will activate it.
Install Qalam Child theme
In order to install child theme, follow same steps as described above for the parent theme. Instead of qalam.zip, use qalam-child.zip file as in your main download archive. Once the child theme is installed, activate it from Appearance > Themes, as shown below:
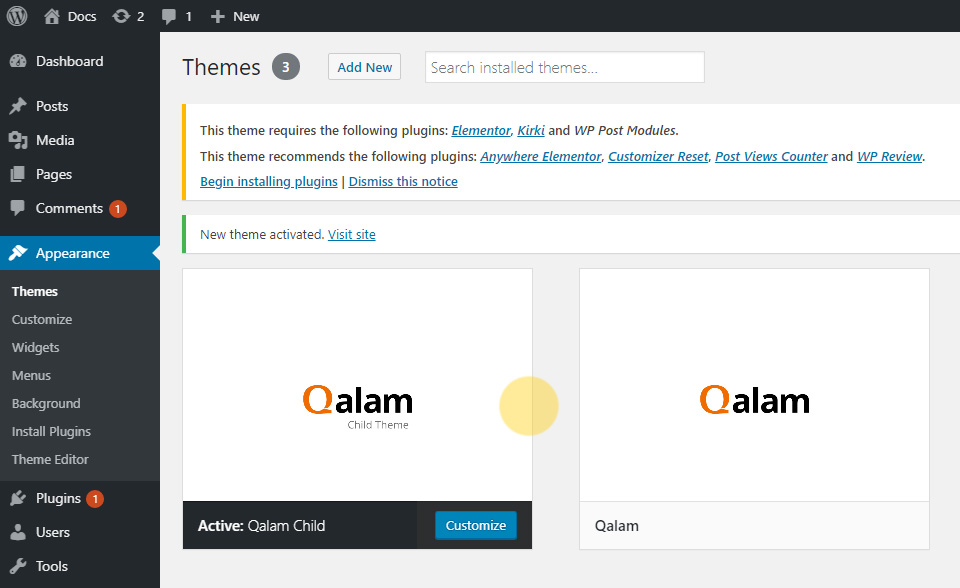 Chid Theme Activated
Upon theme activation you will see a dashboard notice, prompting to install required/recommended plugins.
Install Required Plugins
1. Click on the "Begin installing plugins" link inside the dashboard notice.
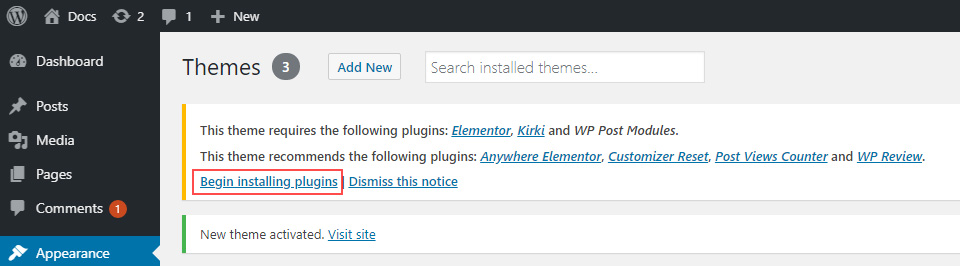 Begin installing Plugins
2. A plugin installer screen will appear, as shown below:
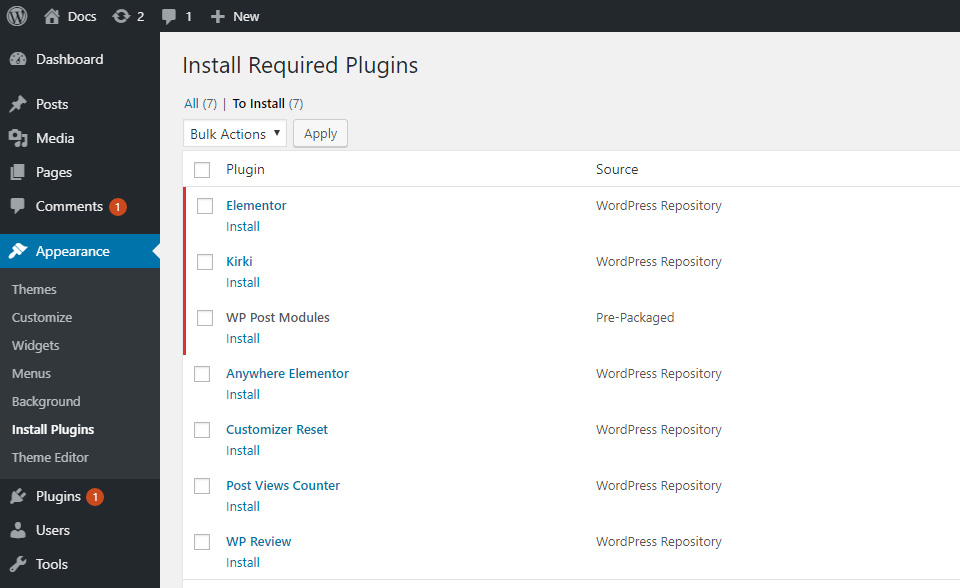 Required and recommended plugins
As you can see, there are several required plugins, whereas others are recommended plugins. Though recommended plugins are optional, I would suggest installing them for ease of customization. Below is a brief description about each plugin.
| Plugin Name | Description |
| Elementor | The Elementor Page Builder plugin is required to create post modules on Home pages. The post modules are created using WP Post Modules addon which requires Elementor. |
| Kirki | Kirki customizer plugin is used to create Theme Options in customizer. You would be able to see all customizer theme options only when this plugin is installed and activated. |
| WP Post Modules | This is an addon for Elementor Page Builder. This is a premium plugin included for free with the theme. This plugin is required to create post modules on any page. |
| Anywhere Elementor | This is a recommended plugin for converting any Elementor layout into shortcodes. For example, you can create a small Recent Posts list using WP Post Modules and save it as Elementor layout shortcode. That shortcode can be used in widget areas. |
| Customizer Reset | This plugin can be used to reset all customizer settings at once. You can reset individual settings too, but this plugin comes useful for bulk reset. |
| Post Views Counter | This recommended plugin is used to show post views on Post Modules and single posts. |
| WP Review | This recommended plugin is used to show post review and star ratings on any post. |
2. Select all plugin, choose "Install" option and click on "Apply" button.
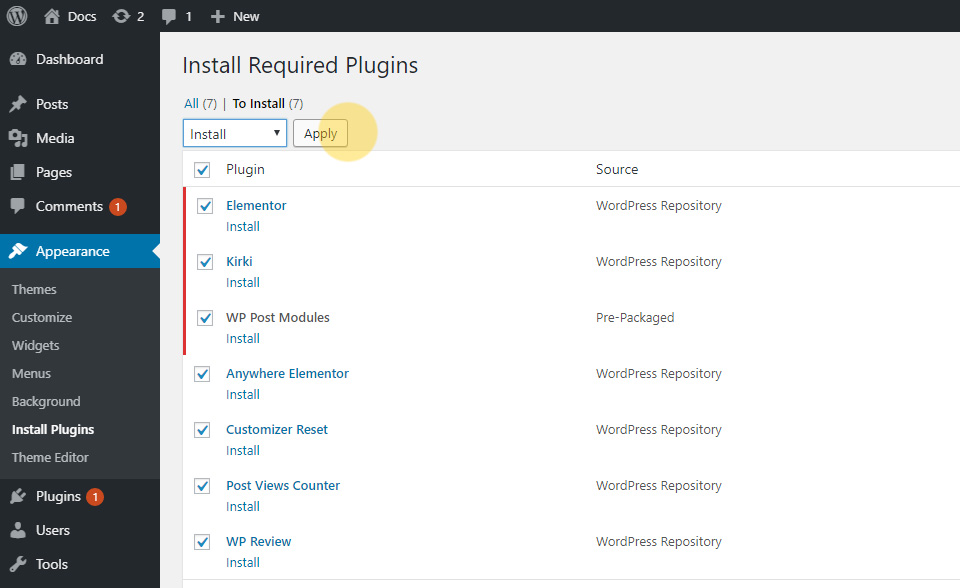 Install all plugins
3. After all plugins are installed, navigate to Plugins > Installed Plugins. Make sure all the above mentioned plugins are activated. If not, click on "Activate" links for each plugin. Alternatively, you can activate these plugins by navigating to the plugins installer screen via dashboard notice.
Import Dummy Content
At this stage, the theme is successfully installed with all required and recommended plugins. The front end may not look the same as live demo yet, as it will be required to create Home page and content as on live demo.
Import Posts and Categories
Important: If your site already contains posts and categories, skip this section.
1. In order to import dummy posts and categories, navigate to Tools > Import.
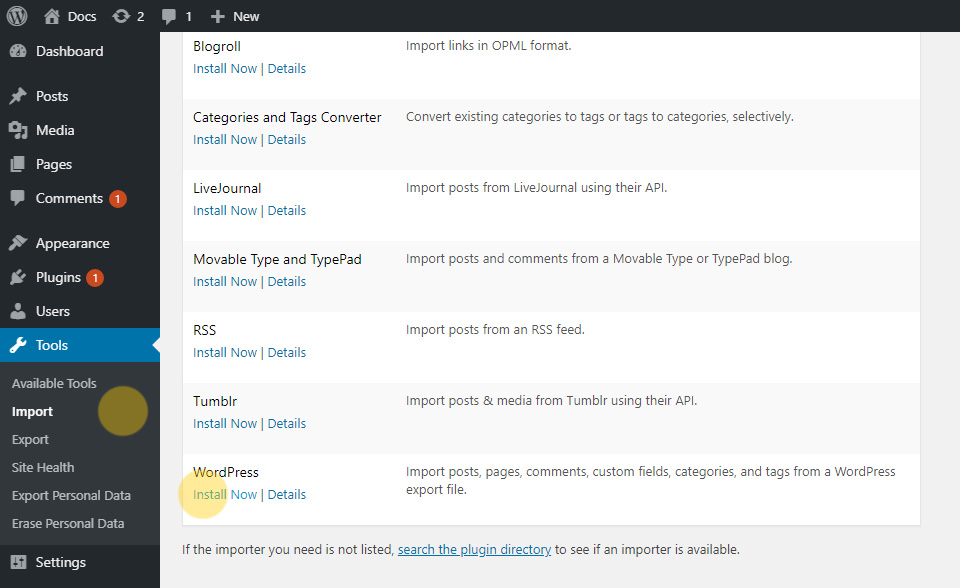 Import WordPress Posts
2. From the "WordPress" import system, choose "Install Now". The WordPress Importer plugin will be installed and activated (if it is not installed on your site).
If the WordPress Importer is already installed, click on the "Run Importer" button.
3. Click on the "Choose File" button.
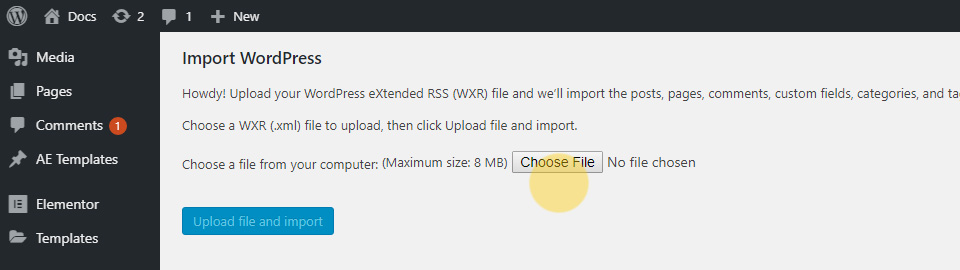 Choose Import File
4. Browse the import XML file. The import XML files are located inside your main download's /dummy_data/ folder. Choose the "posts.xml" file, or "all.xml" file for importing data. After choosing the file, click on "Upload file and import" button.
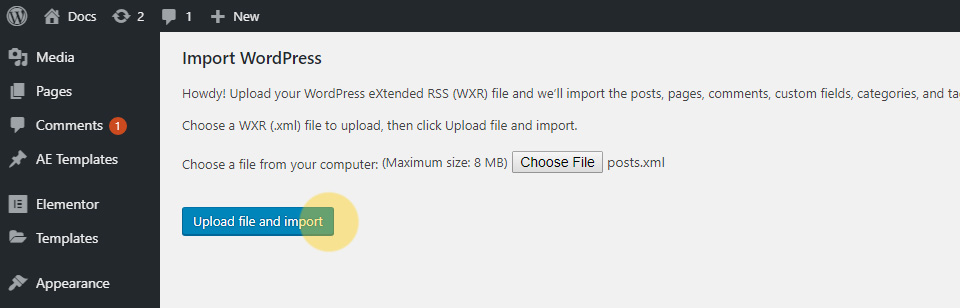 Upload file and import
5. Assign posts to an existing author, and enable "Download and import file attachments" checkbox.
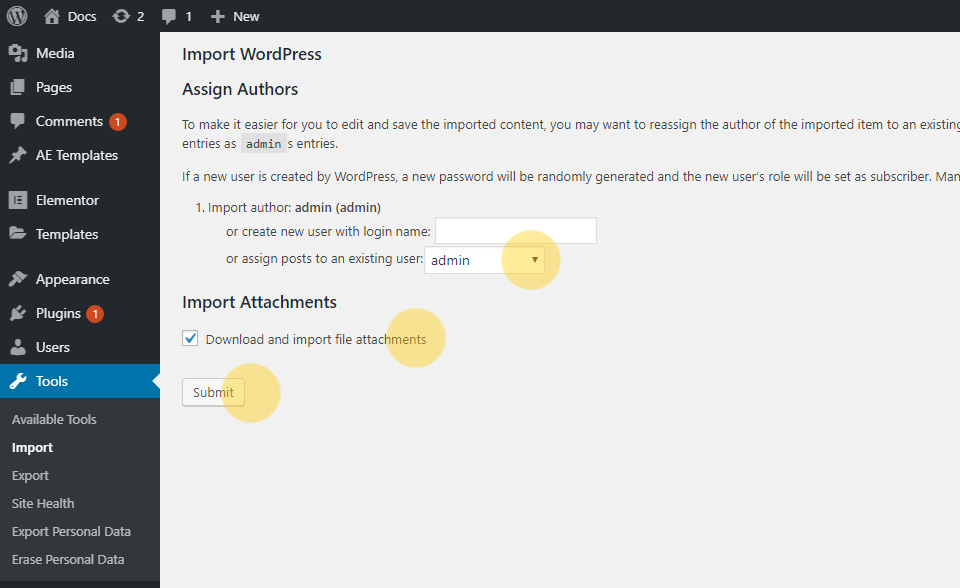 Assign authors
6. Finally click on "Submit" button. The dummy data will be imported and is ready to be used in Home page modules.
Create Home Page
At this stage, your site will show default posts on Home page (if no static page is set as Home page). The theme comes with 10 Home page layouts to be used instantly. You can either import all 10 layouts at once using the pages.xml file or create each page manually by importing the page layout JSON file. In this section we will see how to create a page manually using JSON mport file.
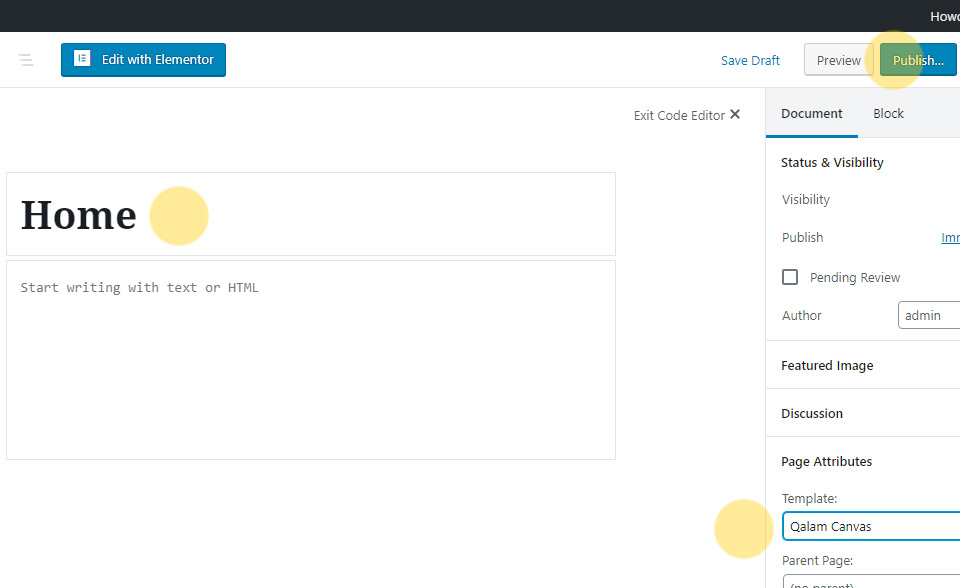
1. Navigate to Pages > Add New. Enter a title for your home page. E.g. Home
2. From the "Page Attributes" panel, choose "Qalam Canvas" or "Qalam Full Width" page template.
3. Click on "Publish" button.
 Create Home Page
4. After the page is published, click on "Edit with Elementor" button.
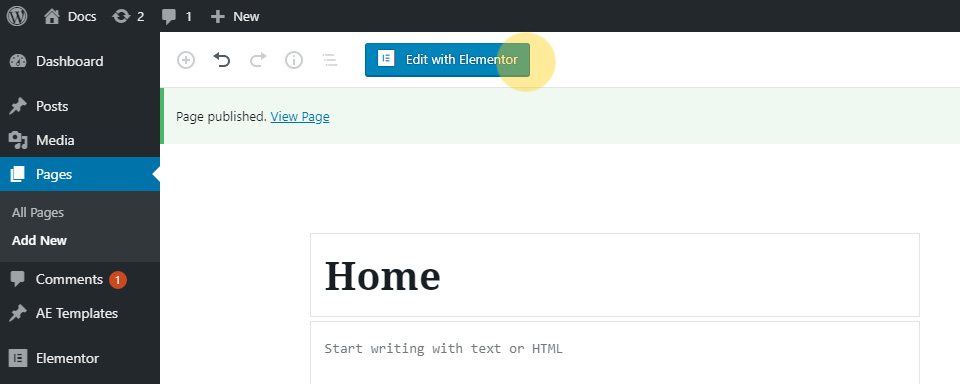 Edit with Elementor
5. The Elementor Page Builder mode will be activated. You shall see a blank page with only the header and footer area. Click on "Add Template" icon, as shown below.
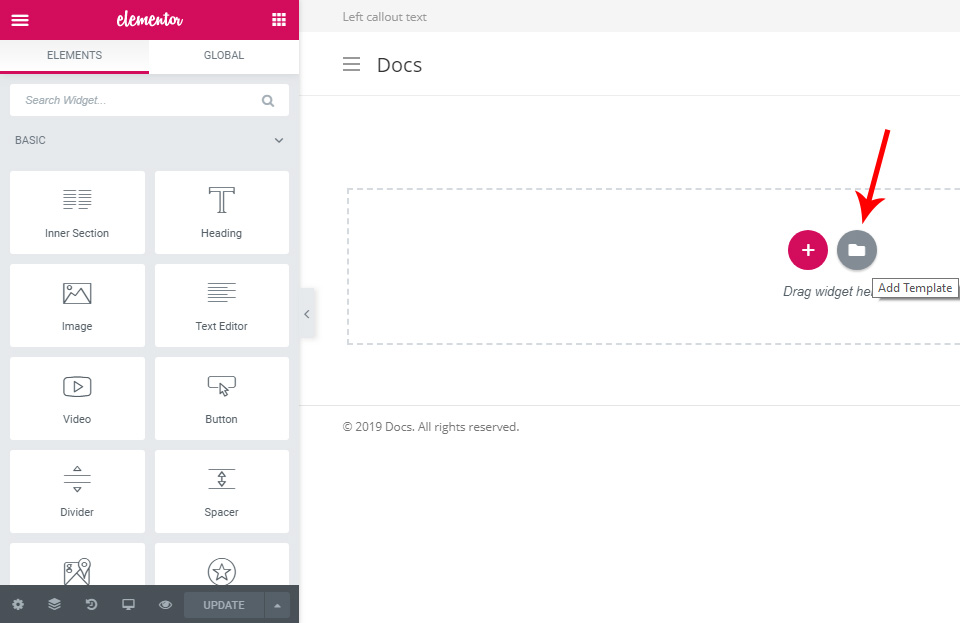 Add Template
6. A template library panel will open. Click on the "Import Template" button.
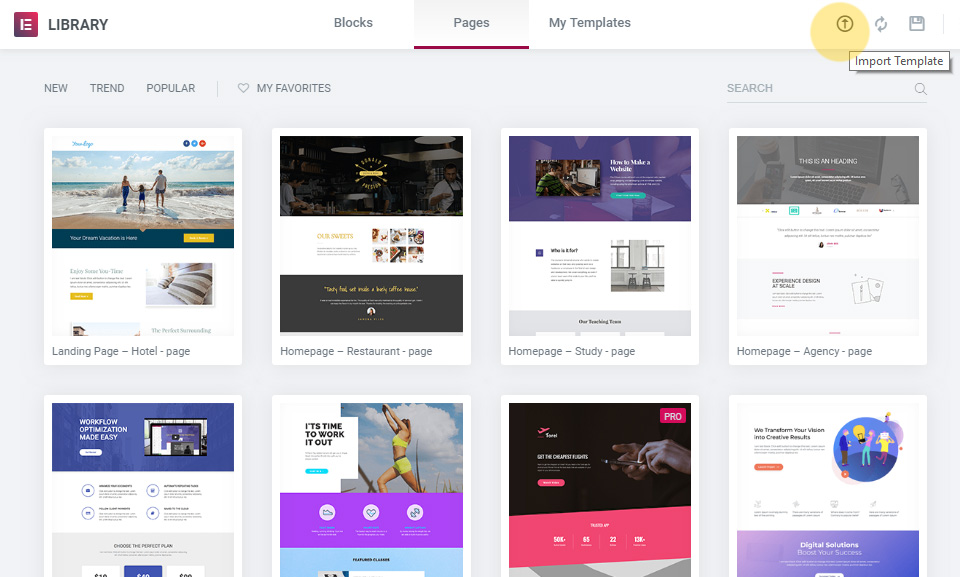 Import Template
7. From the file chooser panel, click on "Select File" button, or drag the JSON template file in this area. The JSON template file is located inside your main download's /dummy_data/demos/ folder. Browse any Home demo file like demo_1.json, demo_2.json, etc.
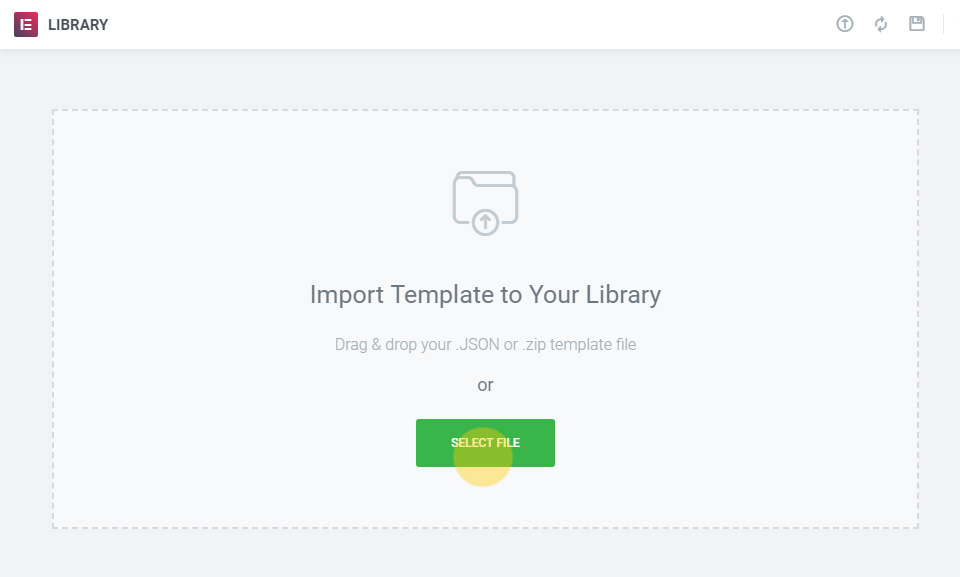 Select JSON template file
In this example, we will import demo_1.json file. After the file is imported, it will appear in template library inside the "My Templates" tab.
8. Click on "Insert" button for insertind the desired layout into the page.
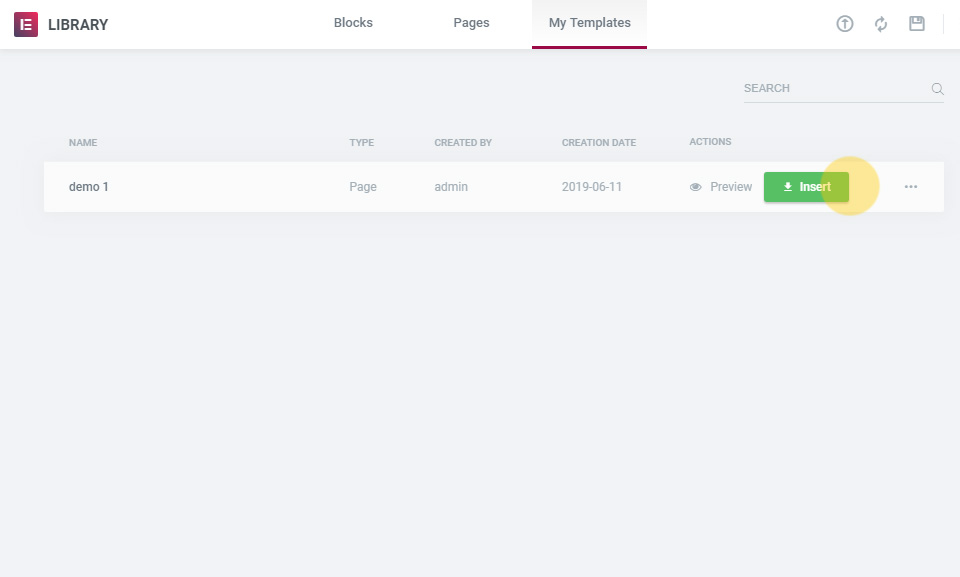 Insert Template
9. A dialog will appear, asking to import document settings. Click on "No".
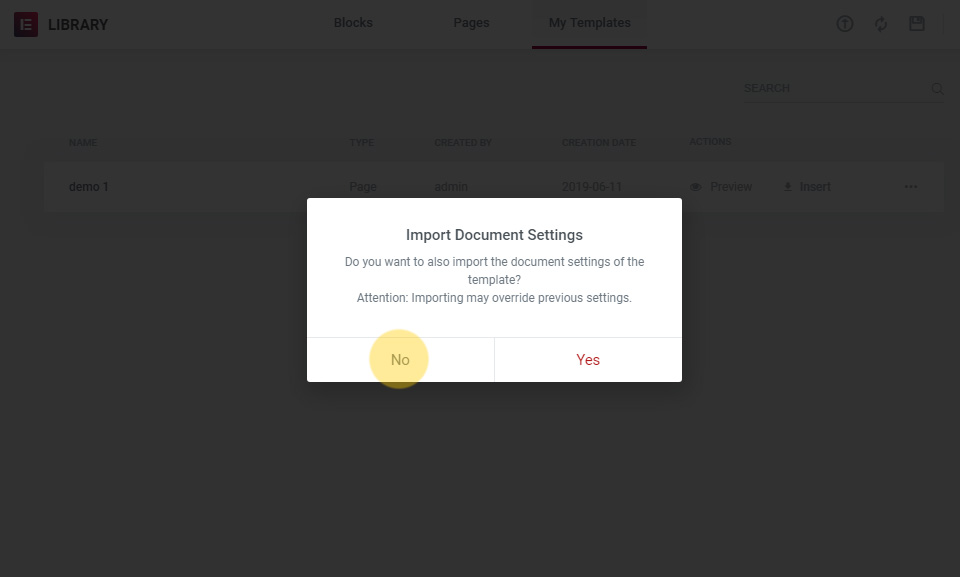 Do not import document settings
10. Upon successful page import, you shall see some sections populated with posts (if your site has posts).
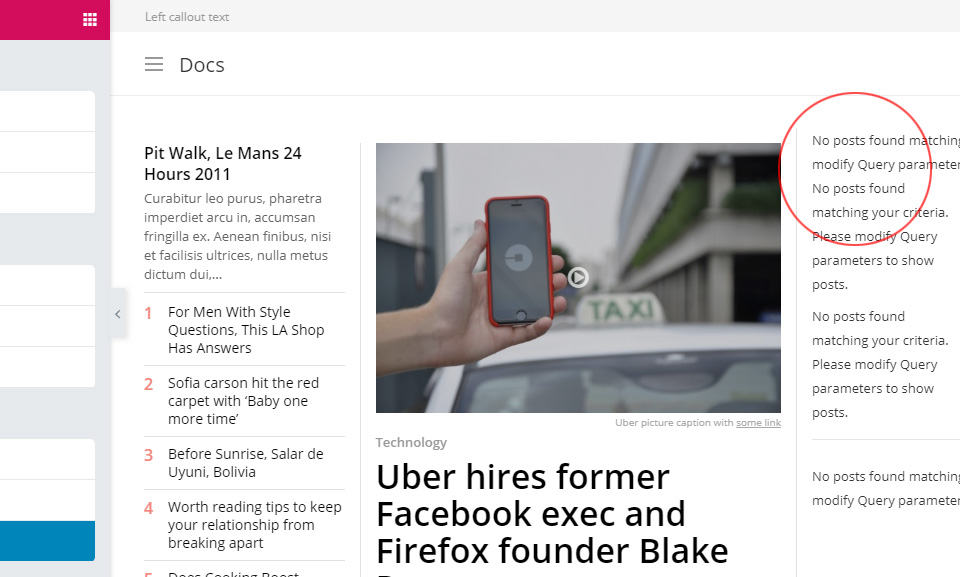 Content Imported
Note: As you can see in above screenshot, some sections show "No posts found" text. This is because a category is not assigned to that post module, or the assigned category does not exist.
11. In order to assign categories to a post module, click on any module. It's settings panel will appear in the sidebar.
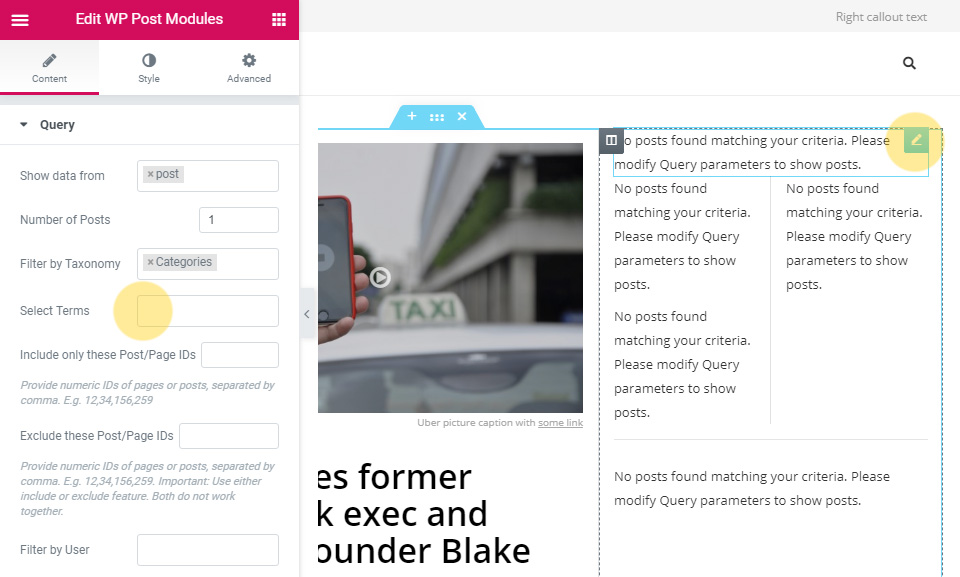 Post Module Settings
12. From the Content > Query section, click on the "Select Terms" and assign your desired category terms to the post module.
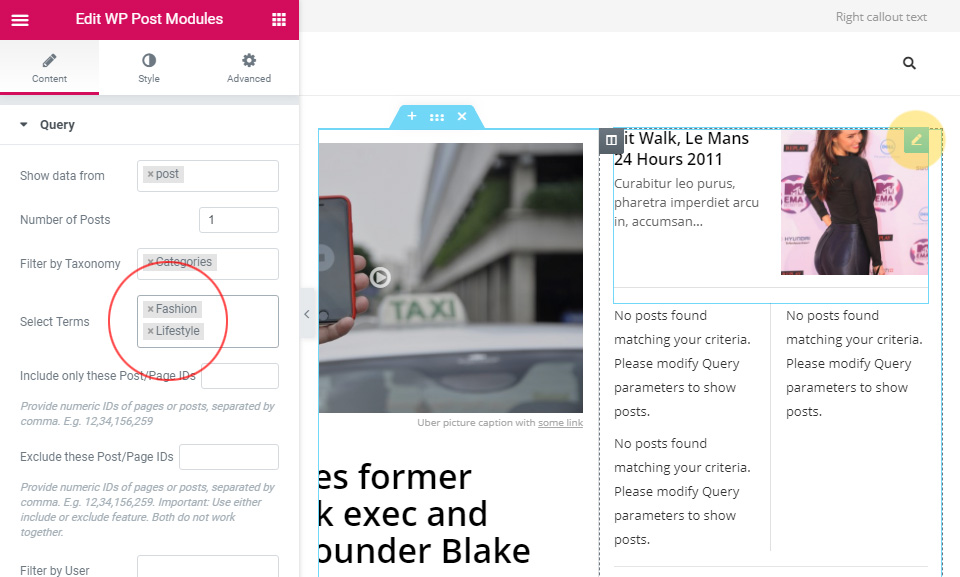 Assign Terms
Upon assigning terms, the module will show posts from that category/terms.
Important: The Posts Module shows featured images assigned to posts. So make sure the posts on your site have featured images assigned.
Following the same procedure as in step 12, assign posts to other sections of the page. You can also create different style page by importing other JSON templates from the dummy data folder.
If you wish to modify the style and appearance of a post module, you can use WP Post Module's various customization options, as described below:
In order to edit the module, click on the module body. The side panel will show settings for this module. The "Content" tab will be open by default, with the "Query" section open. You can choose which posts to show by filtering them using category, orderby, number of posts, and other such parameters in this section. Let's see each section's functionality:
Editing Contents of a Post Module
Content Tab
Query: This section contains options for choosing the post results criteria. You can choose to show posts from category, custom post types, individual posts, pages, etc. You can sort results based on date, comment count, title, etc.
Schema: This section contains option for enabling Schema Microdata in posts module. You can change schema properties in the text fields provided in this section.
Advertisements: This section contains option to show advertisements after n number of posts.
Style Tab
The Style tab is the main customizing tab of this plugin. There are around 8 sections in this tab for styling and customizing the module content as per your need.
Display: This section contains settings for choosing display style like grid, list, tile, ticker, etc. Depending upon the display style chosen, there are various sub settings for margin, padding, colors, columns, etc.
Images: This section contains image specific settings. You can assign image width, height, crop mode and various other settings for images.
Title: This section contains typography settings for post titles of the module. You can choose fonts from a huge library of Google fonts and assign typography settings to the post title.
Excerpt: Similar to the title section, this section contains typography settings for the post excerpt text.
Post Meta: This section contains settings for post meta of each post in the module. You can choose to show/hide post date, author, comments, etc. and style them with different colors and typography.
Social: This section contains option for enabling social sharing buttons per post. Using these share buttons, users can directly share a post on social platform.
AJAX Options: This section contains settings for enabling AJAX functionality on posts module. The plugin supports ajax next/previous navigation, and also ajax loadmore feature.
Slider Options: This section contains settings for enabling slider on a post module. You can choose number of slides to show, along with other settings like animation delay, timeout, etc.
Using these customization options, crete and publish your Home page. Once the page is ready, it needs to be set as front page.
Set Home page as front page
1. Navigate to WordPress admin's Settings > Reading
2. Inside Front page displays > A static page, choose Home page for the front page, and leave posts page unselected.
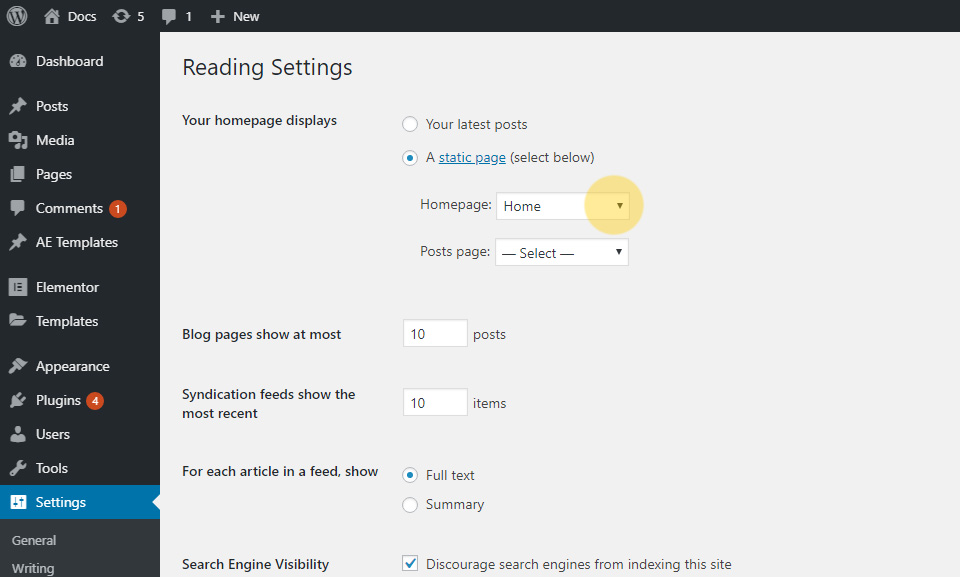 Set Home page as front page
3. Click on "Save Changes" button.
At this stage, your Home page is created and set as front page.
Create Navigation Menus
The theme supports WordPress Menu in three locations. Top Menu, Primary Menu and Mobile Menu. Let's see how to create these menus.
1. Navigate to Appearance > Menus
2. Inside menu name field, provide a menu name and click on "Create Menu" button.
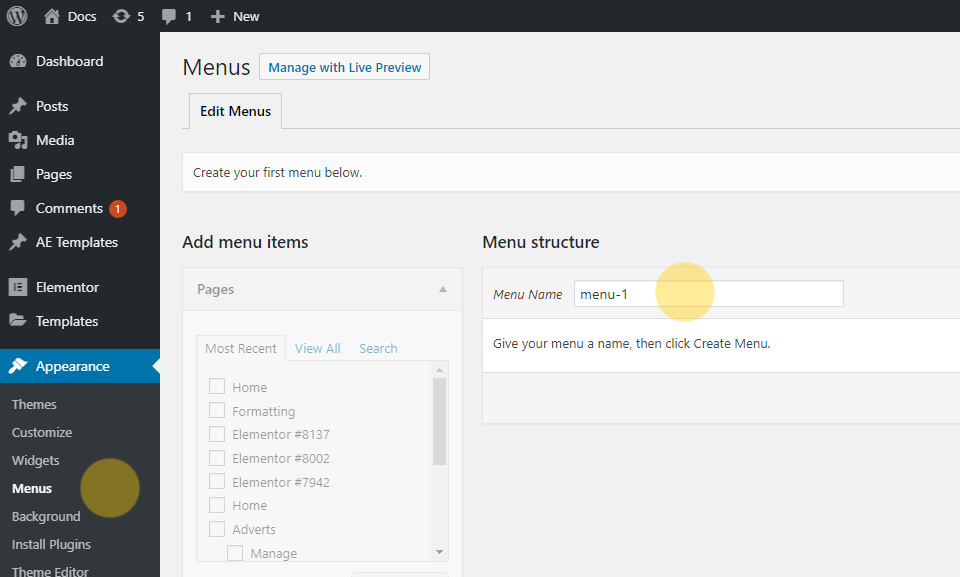 Create new menu
3. Once the menu is created, you can add pages, categories or custom links from the panels on the left hand side.
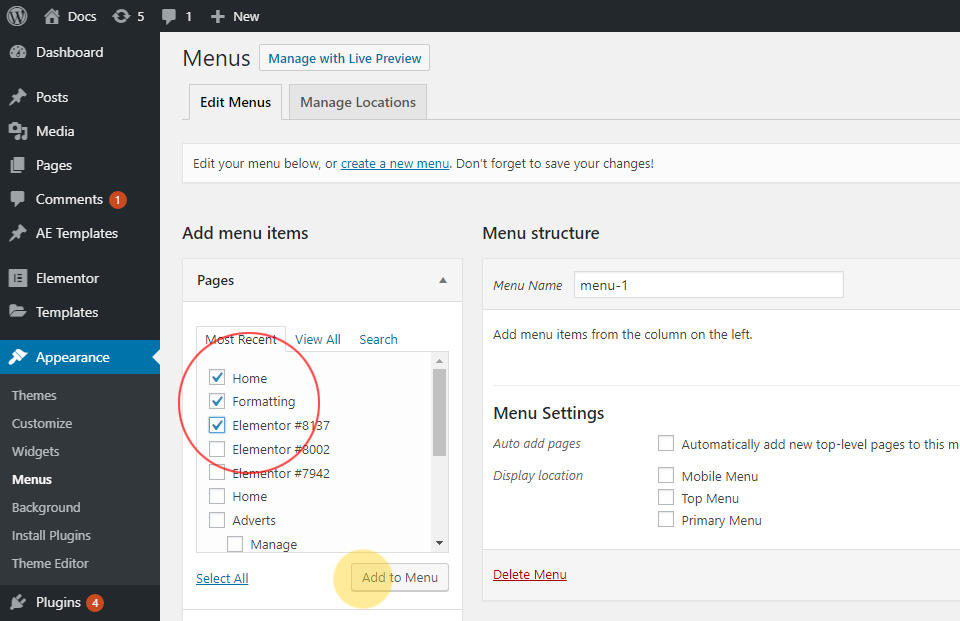 Add menu items
4. In order to make an item as sub-menu, drag the item to the right side. By doing so, it will become direct child of menu item above it.
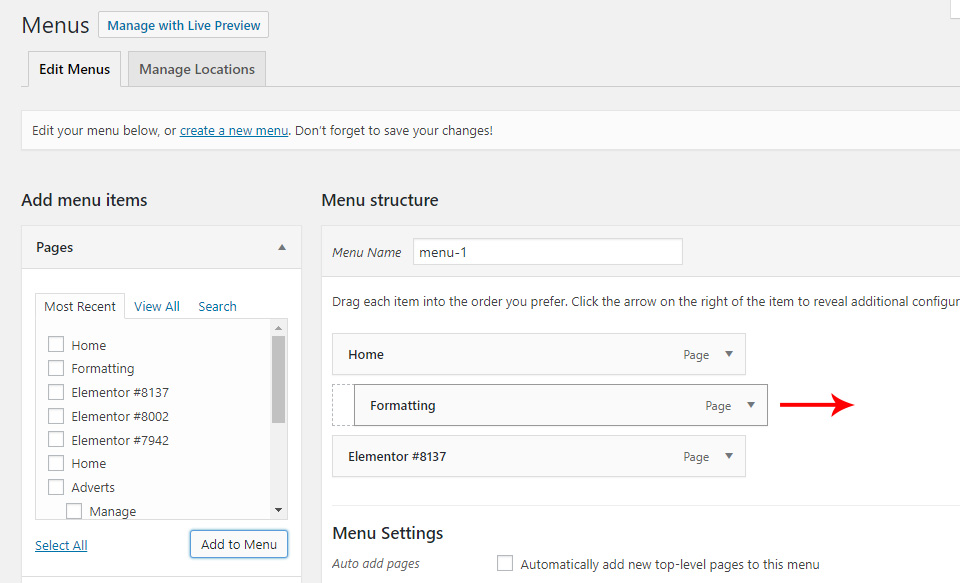 Set menu item as sub menu
5. After adding menu items, scroll down to Menu Settings and assign Display Location as "Primary Menu". Finally Save the menu.
6. Following same procedure, you can create a new menu and assign it to the "Top Menu" and "Mobile Menu" location. You can use the same menu for both locations too. The Mobile menu location is used to show responsive menu on mobile devices.
Widget areas and widgets
The theme supports widget areas in 12 locations. You can access these widget areas by navigating to Appearance > Widgets.
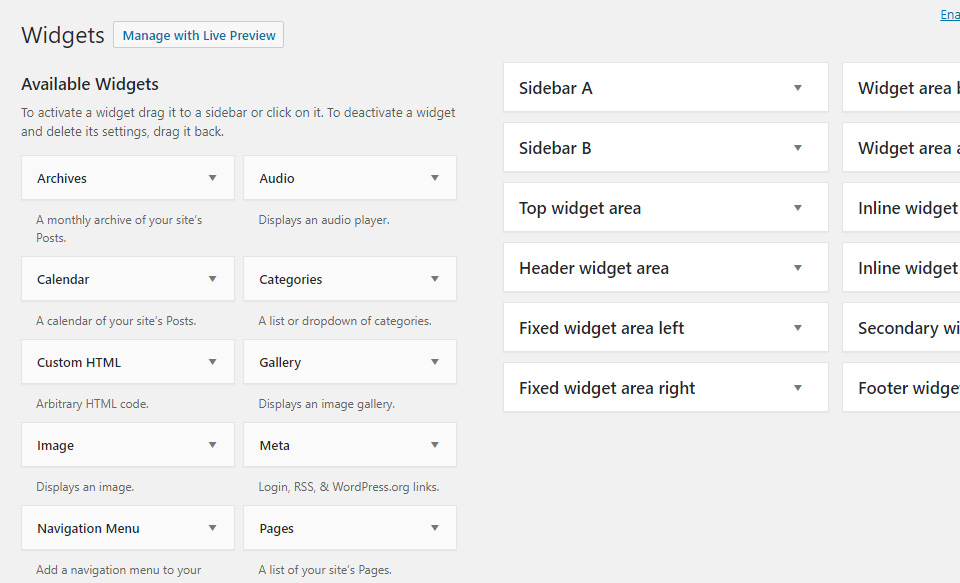 Available widget areas
Below is a table describing the role of each widget area and it's location.
| Widget area | Location and role |
| Sidebar A | This is the primary widget area appearing as sidebar on all pages. |
| Sidebar B | This widget area is a secondary sidebar. This will appear if a three columnar layout is chosen from theme settings (Customizer > Layout). |
| Header widget area | This widget area is located in the header area, next to the logo. This will be visible when header style 4 is chosen from Customizer > Header > Main Header > Main Header Style. This widget area is mostly used to show leaderboard advertisement. |
| Fixed widget area left | This is a floating/fixed widget area on left side of the web page. It can be used to show vertical ads. |
| Fixed widget area right | This is a floating/fixed widget area on right side of the web page. It can be used to show vertical ads. |
| Widget area before content | This widget area is located after the main header, and just before the start of main content. It can be used to show any kind of widgets like advertisement, filters, or scrolling news. |
| Widget area after content | This widget area is located after the main content, and just before the start of secondary widget area. It can be used to show large leaderboard ads or any utility widgets. |
| Inline widget area before post | This widget area is located on single posts only, and appears before the start of post content. It can be used to show 460px ads or any other useful widgets. |
| Inline widget area after post | This widget area is located on single posts only, and appears after the end of post content. It can be used to show 460px ads or any other useful widgets. |
| Secondary widget area | This widget area is located before the main footer. This can be used to show multiple widgets and contact information. You can control number of columns for this widget area inside Customizer > Footer > Secondary widget columns |
| Footer widget area | This is the footer widget area located at the end of page. This can be used to show multiple widgets and site information like copyright text, footer notes, links, etc. You can control number of columns for this widget area inside Customizer > Footer > Footer widget columns |
Some of these widget areas can be enable/disabled via Appearance > Customize > Layout
Customizer Settings
The theme uses Kirki Customizer plugin for generating Customizer options. So make sure this plugin is installed and activated. In order to access Customizer Settings, navigate to Apperance > Customize. You shall see a customizer panel and a preview window, as shown below:
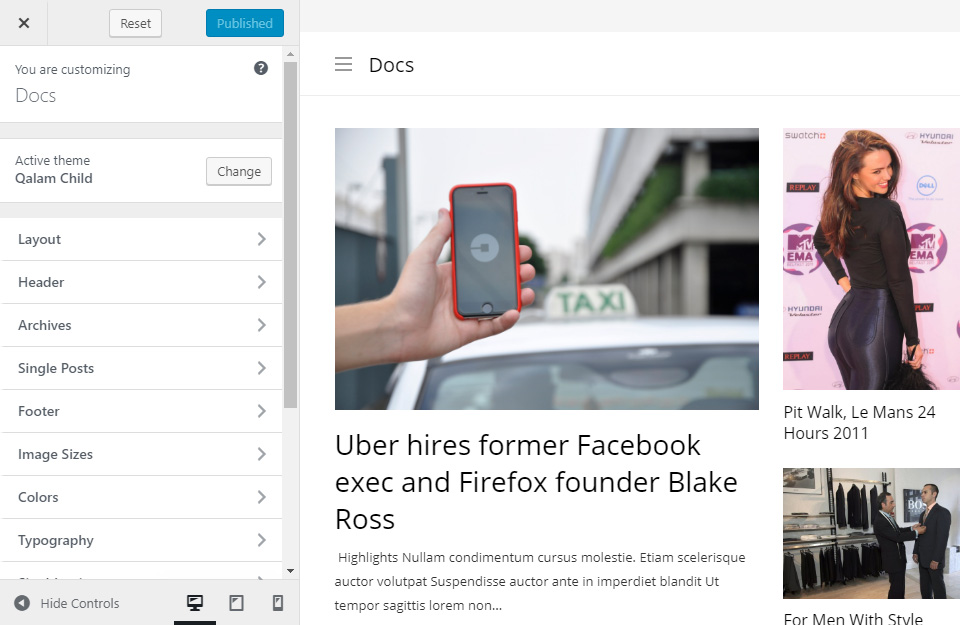 Customizer Settings
Customizer Settings Overview
| Section | Description |
| Layout | This section contains global settings for theme layout, sidebar structure, gutters, etc. You can set general width and overall layout structure using settings in this section |
| Header | This section contains three sub sections viz. Main Header, Top Bar and Social Links. These sections contains settings for adjusting header style, header height, adding utility links, etc. |
| Archives | This section contains settings for archives and blog pages. You can choose archive style, set excerpt length, social icons, etc. |
| Single Posts | This section is specific to Single posts. You can configure single post layout style, title header style, related posts, social sharing, etc. in this section. |
| Footer | This section contains widget column settings for secondary and footer widget area. |
| Image Sizes | In this section you can set global image sizes for Archive and Single Posts. |
| Colors | This section contains color settings for Header area and main Navigation menu. |
| Typography | This section contains typography settings for body, navigation, general headings and widget area headings. |
| Site Identity | In this section you can set site title and logo, along with the site favicon. |
| Background Image | In this section you can set background image for the site body. The background will be applicable only if you are using the Boxed layout. (See Customize > Layout > Layout Style). |
| Menus | In this section you can create and assign navigation menus to different theme locations like primary, top menu and mobile menu. Alternatively, you can also set menus inside Appearance > Menus. |
| Widgets | In this section you can add/remove widgets from different widget areas. Please note that this section may not show all widget areas, depending upon which page is active in customizer preview. For example, if you are seeing a full width page, then it may not show sidebar widget area. So the best place to configure widgets is inside Appearance > Widgets. |
| Homepage Settings | In this section you can choose what to show in Home page. i.e. posts or a static page. |
| Additional CSS | This section can be used to add any extra CSS to the theme. If using a child theme, it is recommended you place all CSS inside child theme's style.css file. |
Important: If you wish to reset all settings at once, kindly install the Customizer Reset plugin. This is a light weight plugin and will add a "Reset" button in Customizer.
Filter and Action Reference
Qalam supports Filters and Actions at different locations of the theme code. These can be helpful in changing content output of theme without modifying core files. This section is for theme developers looking to extend or customize theme features. Below is a brief reference to available filters in theme code:
| Filter name | Description | File |
| qalam_content_width | Applied to the global content width. | functions.php |
| qalam_breadcrumb_sep | Applied to the breadcrumbs separator/delimter. | /includes/breadcrumbs.php |
| qalam_rp_order | Applied to the related posts orderby parameter. | /includes/related-posts.php |
Actions used in Qalam Theme
| Action name | Description | File |
| qlm_after_full_content_title | Executes after post title in full width archive style. | content-full.php |
| qlm_before_grid_title | Executes before post title in grid style archives. | content-grid.php |
| qlm_after_grid_content | Executes after post excerpt in grid style archives. | content-grid.php |
| qlm_before_list_title | Executes before post title in list style archives. | content-list.php |
| qlm_after_list_content | Executes after post excerpt in list style archives. | content-list.php |
| qlm_before_mix_hero_title | Executes before post title in mix style archives. | content-mix.php |
| qlm_after_mix_hero_content | Executes after post excerpt in mix style archives. | content-mix.php |
| qlm_before_mix_sub_title | Executes before post title in sub posts of mix style archives. | content-mix.php |
| qlm_after_mix_sub_content | Executes after post content of sub posts in mix style archives. | content-mix.php |
| qlm_before_mix_list_title | Executes before post title in list posts of mix style archives. | content-mix.php |
| qlm_after_mix_list_content | Executes after post excerpt in list posts of mix style archives. | content-mix.php |
| qalam_after_main | Executes after the end of main content. | footer.php |
| qalam_sharing_buttons_li | Executes before closing of social sharing list ul. The content should be wrapped in li tags. | functions.php |
| qalam_search_form | Executes inside search panel div used in header. | functions.php |
| qalam_after_header | Executes after header area and before the main content. | functions.php |
| qlm_single_content_before | Executes bfore the start of single post article tag. | single.php |
| qlm_single_content_after | Executes after the end of single post article tag. | single.php |
| qalam_utility_links | Executes inside the utility lins div in header. | /template-parts/header/header-*.php |
Language Localization
The theme is translation ready and supports localization. If you are using WordPress in native language, you can use qalam.pot template POT file for translating strings into your own language. The file is located inside qalam/languages/ folder. In order to create a translation file, follow these steps:
1. Download poEdit software from their official site. (The software is free).
2. Install the poEdit software on your computer.
3. Open poEdit and click on File > Open from POT/PO file.
4. Locate and choose qalam/languages/qalam.pot file.
5. A pop-up will appear for the Translation Language. Choose your appropriate language and click "Ok".
6. Save this file by clicking File > Save. The file shall be saved in language_country.po format. For example, fr_FR.po
7. After saving the file, navigate to Catalog > Properties.
8. Inside "Translation Properties", you can change project name, language, etc. After making the changes, click "Ok".
9. Navigate to Catalog > Update from sources. The software will scan all files and will update from source php files.
10. Click on any message string and type it's translation inside the "Translation" field.
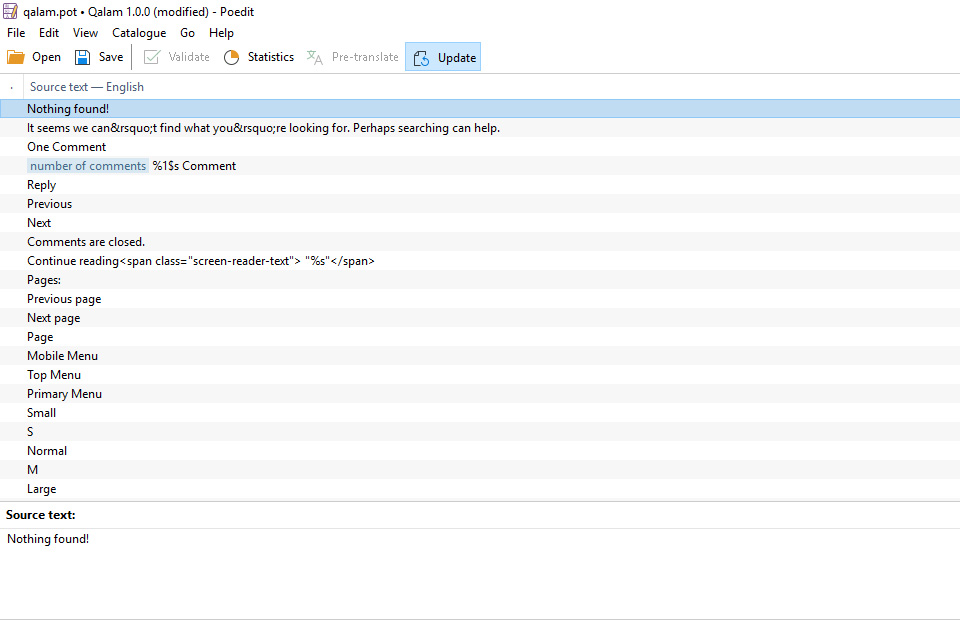 Translation in poEdit Software
11. After making translations, save the file via File > Save. A .mo file will be generated inside the qalam/languages/ folder. This file can be now used for translation.
12. Inside WordPress admin, navigate to Settings > General > Site Langage, and choose the language which you have set in poEdit. Save these settings as well.
Now your site shall show translations as done in poEdit. Alternatively, you can use language localization plugins like Loco Translate, PolyLang or any similar plugin you like.
HTML Structure
The output of any WordPress theme is pure HTML in browser. The HTML output of Qalam theme, in most general case, can be divided into the following sections:
- Body
- Responsive Menu
- Top Utility Bar
- Page
- Header
- Main header (logo + menu)
- Breadcrumbs
- Main content area
- Primary content
- Sidebar widget area
- Secondary widget area
- Footer widget area
- Header
These sections can be seen in HTML markup as:
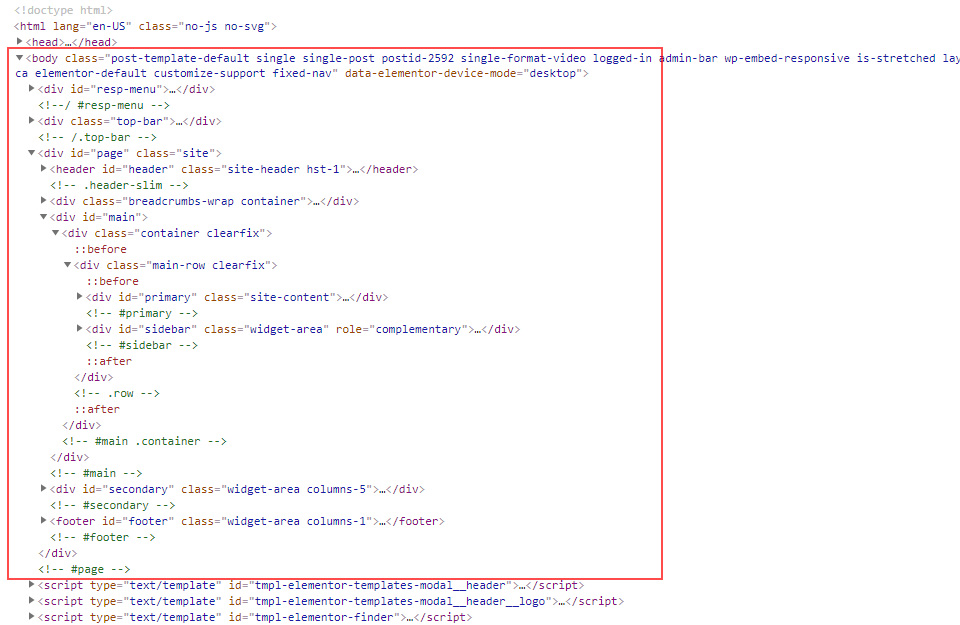 General html structure of theme
CSS files used in the theme
The CSS files used by Qalam theme are as follows:
| File name | Description |
/assets/css/all.min.css |
This is the CSS file for all Font Awesome 5 font styles. |
/assets/css/ie9.css |
This is Internet Explorer 9 specific stylesheet. The file is loaded conditionally on ie9. Any IE related fixes shall be placed in this file. |
editor-style.css |
Used to style site/page content when in editing mode. |
rtl.css |
Used to add styling support for languages with right-to-left orientation. |
style.css |
The main stylesheet of the theme. |
The main styleshet style.css is categorized into different sections as listed in the "Table of contents" at the top of the file. This table of contents can be used for locating particualr styles inside CSS file. Though it is not the best method of locating CSS selectors. The best way is to inspect an element in Firebug or Chrome console and locate the exact selector and it's source file.
It is not recommended to edit original source files. If you need to add any extra CSS style, you shall use child theme's style.css file for adding custom CSS, or use Appearance > Customize > Additional CSS.
Javascript files
The JavaScript files used in Qalam theme are as follows:
| JavaScript file name | Description |
/assets/js/html5.js |
Used for fallback support of html5 tags in old browsers |
/assets/js/qalam.frontend.js |
Contains all JavaScript functions and initializations for the theme. |
Frequently Asked Questions
Below are some Frequently Asked Questions that may help you in finding a solution to your specific issue.
1. I have just uploaded the download zip file to WordPress, and it is showing stylesheet missing error.
There are two types of download files which you can access inside your Themeforest account's Downloads page. One is the "Installable theme file only" and other is "All files and documentation". You need to download installable theme file and upload it to WordPress. You can also find the same file qalam.zip by extracting the main download zip archive.
2. Secondary widget area not showing even if widgets are placed in it.
The secondary widget area is set to hide by default. You can enable it inside WordPress admin's Appearance > Customize > Layout > Secondary Widget Area. Enable this toggle and then Save and publish the changes.
3. How to create vertical icon list as shown in secondary widget area on live demo?
Navigate to Appearance > Widgets. Inside Secondary Widget A or B, use a text widget and paste the following markup in it:
<ul class="icon-list-vert">
<li><i class="icon fa fa-map-marker"></i>Qalam Magazine<br>
123 A, The Star Street<br>
P.O. 1150 South Mount, CA</li>
<li><i class="icon fa fa-envelope"></i><a href="mailto:info@yoursite.com">info@yoursite.com</a><br>
<a href="mailto:support@yoursite.com">support@yoursite.com</a></li>
<li><i class="icon fas fa-phone-alt"></i>+1 234 567 8910</li>
<li><i class="icon fab fa-twitter"></i><a href="https://twitter.com/xconsau">Follow on Twitter</a></li>
</ul>
4. How to update the theme?
The best way to get automated updates is to install and activate the Envato Market Plugin. Please check installation instructions on the plugin page. Using this plugin you can get automatic updates on themes and plugins purchased from Envato Marketplace. Besides this, you can also update the theme manually using the following method:
Step 1: Log in to your marketplace account and download latest "Installable theme file" archive.
Step 2: Using FTP or File Manager of your Hosting account, upload the 'qalam' theme folder to /wp-content/themes/, replacing the old one.
Step 3: Log in to your WordPress site, clear all browser caches and plugin caches (if using any caching plugins).
4. How to use post labels feature?
Post labels is a custom field feature which lets you display custom post labels alongside the post title. E.g. "Live News", "Offer", "Promoted", etc. In order to use post labels, follow these steps:
Step 1: Navigate to WordPress admin's Posts > All posts. Next, edit any post on which you wish to set a label.
Step 2: Enable "Custom Fields" by clicking on the preferances menu icon.
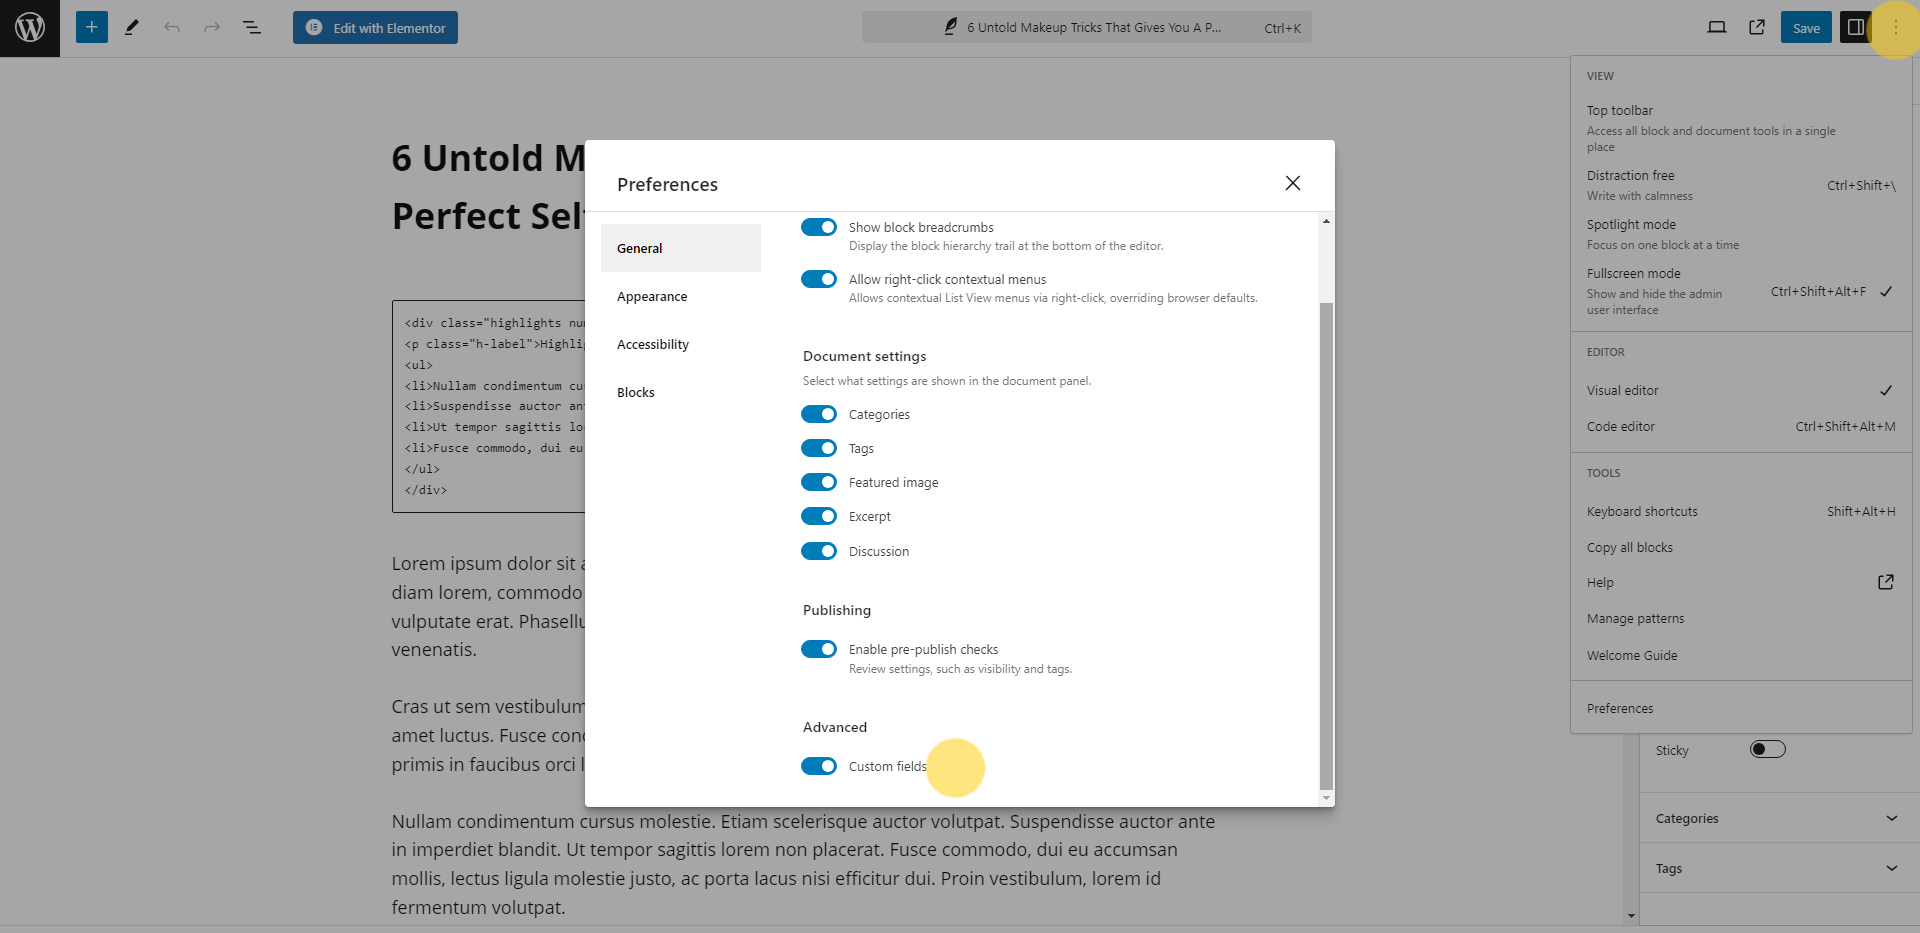 Enable custom fields panel
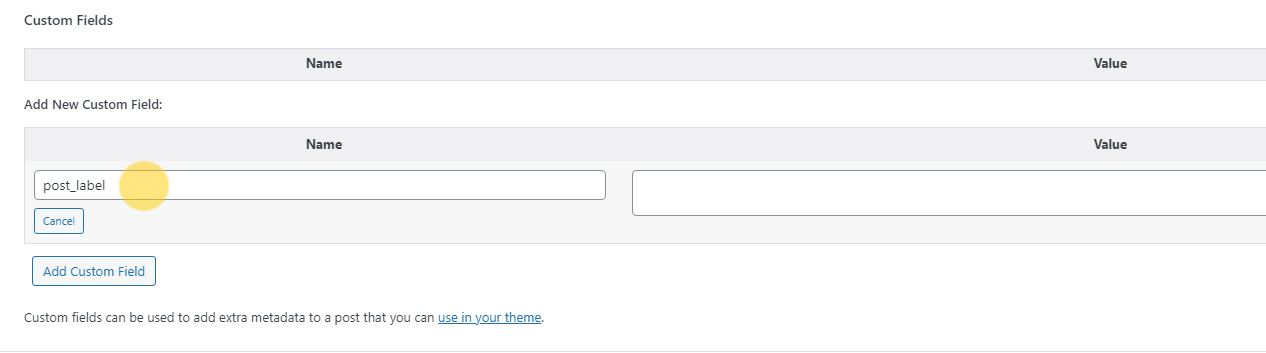
Step 3: Once the Custom Fields panel is enabled, create a new field named "post_label", as shown below:
 Enter new field
 Add post label field
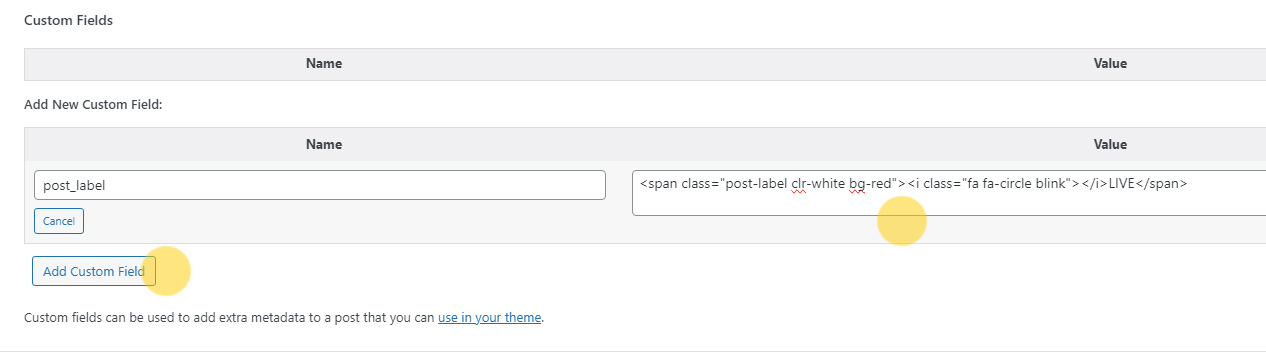
Inside the value field, paste the following markup for the label.
<span class="post-label clr-white bg-red"><i class="fa fa-circle blink"></i>LIVE</span>
Step 3: Next, click on "Add Custom Field" button.
 Add custom field
Once the field is added, update/save the post.
You can use any available Fontawesome icon class name inside the above markup. You can also change the label text as required. There are also some built in color classes for foreground and background which you can use inside the makrup.
Text color classes:
clr-white
clr-red
clr-green
clr-blue
clr-orange
clr-black

Background color classes:
bg-white
bg-red
bg-green
bg-blue
bg-orange
bg-black
Sources and Credits
The theme uses following files and resources, as listed:
Font Awesome Free 5.9.0 by @fontawesome - https://fontawesome.com
License - https://fontawesome.com/license/free (Icons: CC BY 4.0, Fonts: SIL OFL 1.1, Code: MIT License)
HTML5 Shiv 3.7.3 | @afarkas @jdalton @jon_neal @rem | MIT/GPL2 Licensed
BFI Thumb - WP Image Resizer v1.3
© 2013 Benjamin F. Intal / Gambit
TGM-Plugin-Activation 2.6.1
http://tgmpluginactivation.com/
Thomas Griffin, Gary Jones, Juliette Reinders Folmer
Images on live demo from Unsplash and Pexels. Images are not included in download package.
Once again, thanks so much for purchasing this theme. I'd be glad to help you if you have any questions relating to this theme.
Saurabh Sharma